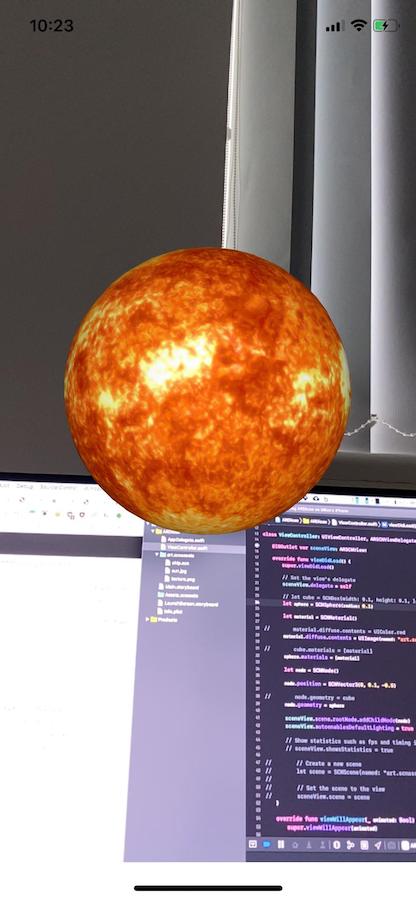
If you happen to be one of the lucky people living in London you couldn’t miss we’ve had a bit of a sunlight crisis [not just recently]. Instead of the usual vitamin D deficiency which we are used to being brought to our attention during regular health checks things have been a little bit worse than that. First we got a visit by storm Ciara which was then shortly followed by storm Dennis. What do you do when the only sunlight you can get is watching David Attenborough documentaries on Netflix? You guessed it! You build an ARKit app in Swift which lets you put the fiery sphere [not just] in your room. Now you can get sunlight whenever you need it, wherever you are! Just tap the screen and off you go! You can find the full implementation of the app on GitHub.
This blog post describes my foray into the world of iOS app development. Past few weeks I’ve spent a bit of time learning Swift and iOS by reading tutorials and watching youtube videos that would help me understand the core principles of it. Though I’ve built a few other apps whilst learning the iOS development I decided to write a blog post about this particular one, because I believe the future we are headed towards is very AR/VR based and it’s the topic which I find super interesting and exciting. Besides, after sharing the excitement of my first [somewhat] ever working ARKit app with my friends, a few of them asked me about how hard was it to get started with ARKit or with the iOS development in general. Hopefully, this blog post will shed some light on the process I went through. Let’s get started!
Swift
If you want to start building iOS apps you need to learn a bit of Swift. Ok, maybe a little bit more than just a bit. The getting started is probably the best resource to get started with Swift. It will give you a taste of both the language features and the tooling. If you have some experience with programming in Go or/and Rust I think you will be able to pick up the basics pretty quickly. Fortunately, I’m a bit of a Christopher Columbus of programming languages – if you go to my GitHub you will find a bunch od random [and mostly useless] projects in various programming languages (Python, R, Elixir, etc.) – so it was surprisingly easy for me to pick up the basics. I would not dare to say I’m fluent in Swift!
After reading the getting started guide I hacked up a few simple command-line tools to get a bit of a feeling for the language, After that I figured, ok, I am ready-ish to start hacking on this iOS thing. Oh my, was I wrong!
Swift is one of those programming language which I still can’t quite make up my mind about. I don’t know what is its defining feature besides its being the primary language for developing iOS apps. The language has pretty much any feature you can find in other languages and some more on top of those. Hacking in Swift feels like if the creators of Go, Rust, and C++ met at some cooking show (we like those in Britain!) and cooked some kind of programming language goulash: you’ve got classes (inheritance, etc.), immutable structs, protocols (you can also inherit these), properties (read-only, write, wrappers, etc.). You name it! What was interesting to me though was once I read up about most of these features somehow the language itself started growing on me (I haven’t got it checked yet!) and when switching to a different language I missed some of Swift features.
The language documentation is pretty good. It contains loads of examples that make understanding the language features quite clear. Come to think of it, I may have read most of the articles in the official language guide over the past few weeks. I have also watched a bunch of videos, but I always ended up going back to the guide as I could copy-paste the example code into my editor, modify it and see how things work. There is probably a better way to learn Swift – I skimmed through this tutorial for example and it seemed pretty good to me, too.
XCode
I don’t think the beast of the IDE the XCode is actually needs any introduction here, besides saying, you do need to learn how to get around it effectively and there is no substitute for experience I’m afraid. The first few steps will probably feel a bit frustrating to the beginner (I was one so I should know!), but once you get past that early period all you’ll be left with is….even more frustration by XCode being slow, half-broken and occasionally even crashing in the middle of editing [an important] part of the code or storyboard session. It’s ok, generally, you can recover the work you were in the middle of when the IDE crashes – I’ve not experienced any catastrophic crash I could not recover my data from, yet!
Storyboard
Storyboard is where you define the User Interface of your app. Generally, you can do this by dragging and dropping widgets into the main View Controller and then modifying their attributes in the attribute inspectors. Things can get pretty complicated here if you want your layout to be responsive to different positions of the device, so you might want to read up on auto-layout. The best resources I found are this article or here. Both are good primers to get you started.
SwiftUI
Alternatively, you can choose to build the UI for your app using SwiftUI which was introduced only recently at WWDC. If you’re building something simple it’s probably the better option as it truly does simplify building the UIs, but at the time of writing this blog post, SwiftUI is incomplete, slightly buggy and does not provide the full feature set you have access to when using the storyboard. But I can see where Apple are going with this. Playing with it felt like building Web components, so at some point, I’m sure it will get much easier to transpile between HTML components and SwiftUI and/or share the SwiftUI components across projects. But at the moment I think we are not quite there. Alas, this opinion comes from an amateur iOS hacker, so some Swift gurus out there might disagree with me!
There is SO MUCH more I could go on and talk about, but I’m going to stop here and just say that the most important thing when learning something new is perseverance. In my experience, when learning something new I need to constantly create things so I can see tangible results of my activity. I hate reading myself to death, but equally, when I come across something I don’t understand or know much about I never shy away from diving deep into documentation or StackOverflow. But making things, ideally the things I find interesting, is the best way to learn for me. So without further ado, let’s get started building the ARKit app I decided to call ARLondonSun.
ARLondonSun - ARKit app [not only] for Londoners
ARLondonSun app allows the user to place a sun object into the AR scene by simply tapping the device screen. In order to do that we will use the ARkit. This is the first time I have built anything with ARKit so go easy on me here. Some of what I say might be incorrect. Please do leave a comment if you spot anything that’s wrong! Let’s get started by creating an XCode project.
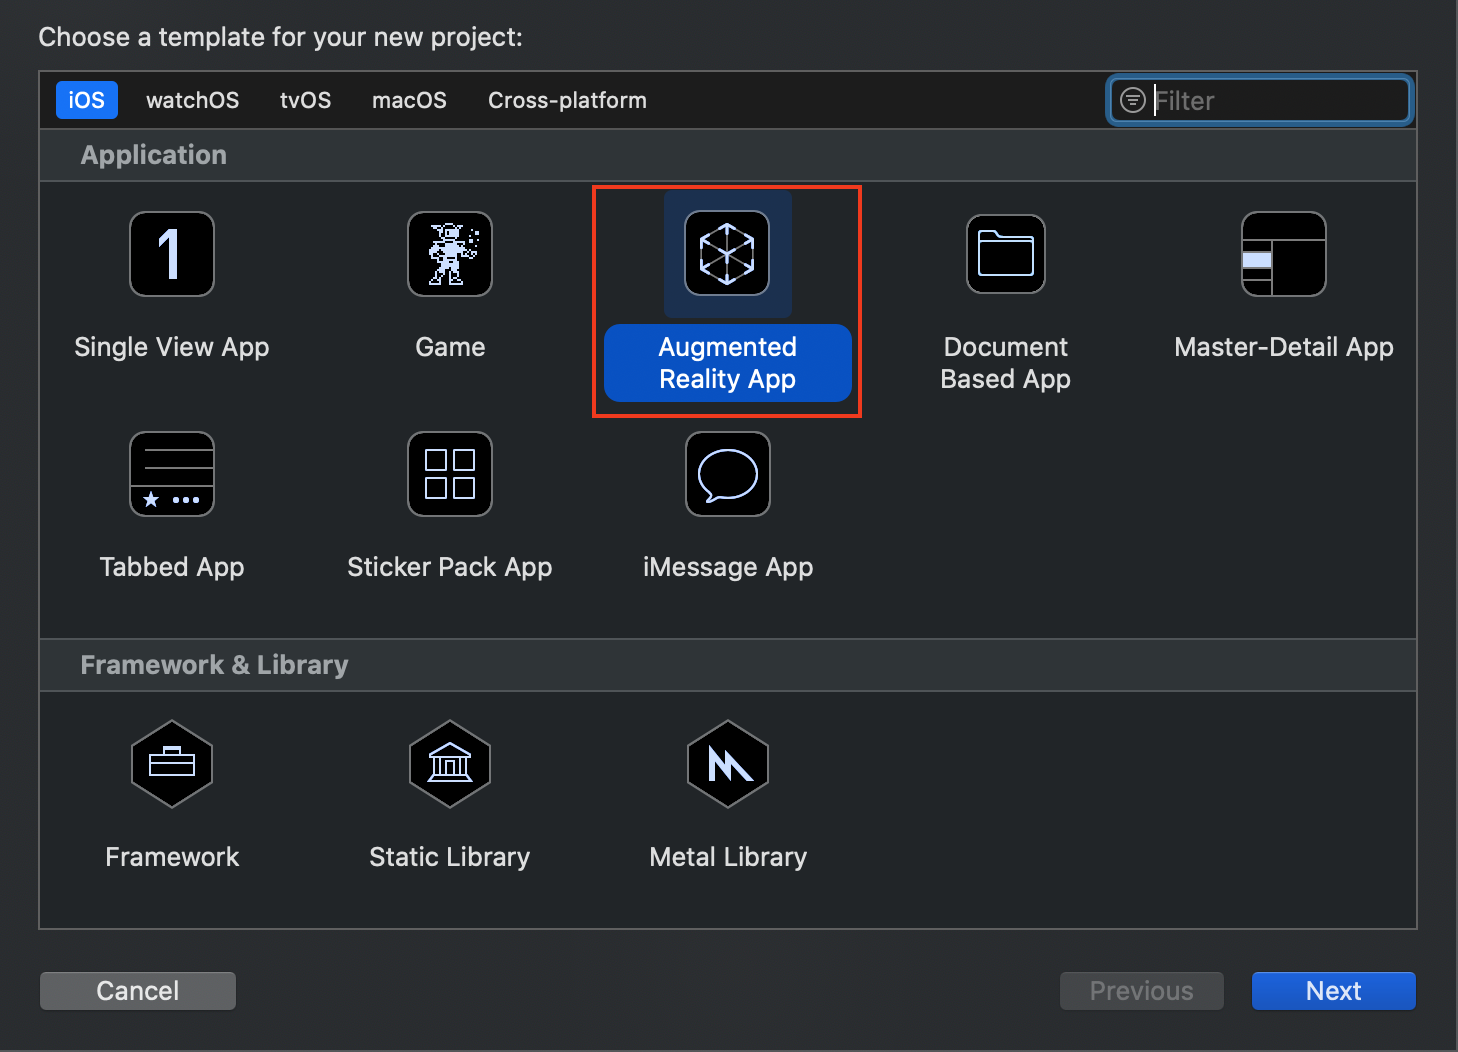
When creating a new iOS app project, XCode will prompt you to choose what kind of project you would be building. Pick the Augmented Reality App from the offered options:
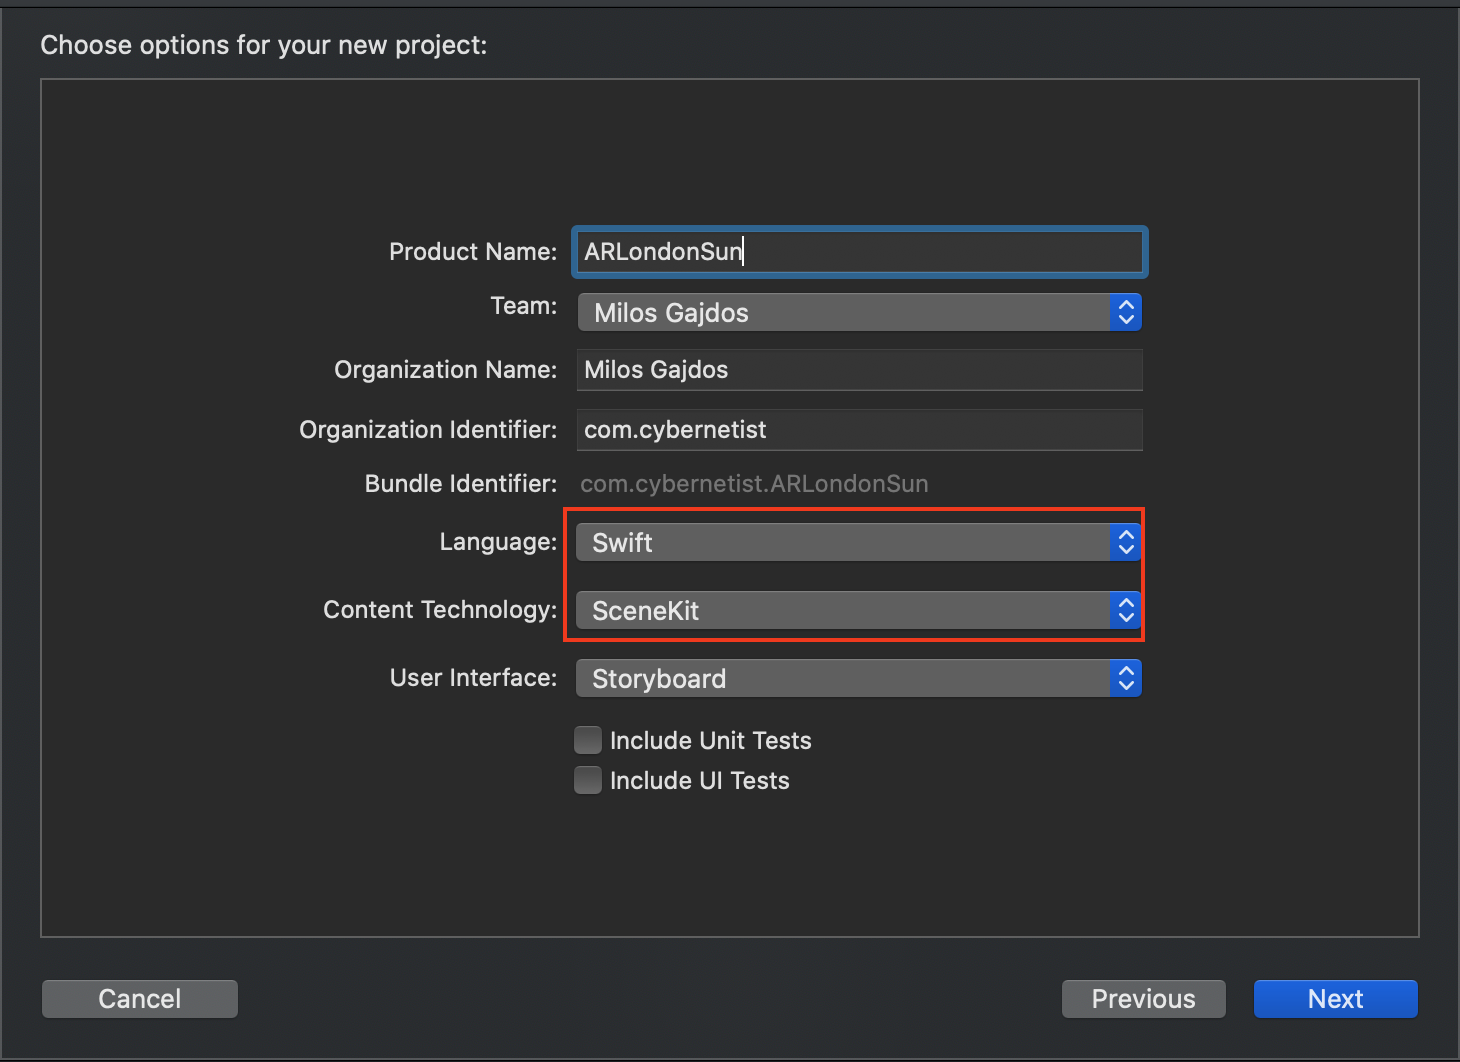
You’ll then have to fill in various project properties. Make sure you choose Swift and Scene Kit options as shown below:
NOTE: Since you CAN NOT run the AR apps in a simulator as the ARKit needs access to the camera you will have to test the app directly on your phone. For that, you might need to create an Apple Developer account and set up your Xcode accordingly. XCode will let you build the app even without the real device, but you can’t run it without one, unfortunately.
XCode will generate a few Swift source code files, a generic storyboard (which will contain ARKit Scene Kit View) to get you started as well as AR(t) Scene assets, which in the newly created project are a 3D model of a ship and its texture. You can play around with the model by dragging it around and get a feel of the 3D rendering. Pretty cool!

In our project, we won’t be using any of the above-decribed default assets so go ahead, select them in the file explorer in XCode and then delete them by pressing backspace. We will add our own AR scene assets to the project later on.
With the default assets deleted let’s remove the following two lines from ViewController.swift file and let’s move on:
        // Create a new scene
        let scene = SCNScene(named: "art.scnassets/ship.scn")!

        // Set the scene to the view
        sceneView.scene = scene
When you open the ViewController.swift file. You should notice XCode automatically imported both ARKit and SceneKit modules for us when we created the project. You can read more about SceneKit in the official docs – it basically provides an API that lets you compose scenes for games and AR apps using higher-level components called Scene Nodes. The Scene is actually a graph or hierarchy of objects that it’s composed of. SceneKit lets you define and customize the scene nodes and render them on the scene efficiently without your knowing much about the low-level details of 3D rendering.
After removing the two lines of code mentioned above I usually enable default lighting to add a bit more light into the scene in case its a bit dark and I also place the feature points (small yellow dots) on the screen during development phase so I can see the AR session in real-time. Our viewDidLoad() should look as follows:
override func viewDidLoad() {
        super.viewDidLoad()

       self.sceneView.debugOptions = [ARSCNDebugOptions.showFeaturePoints]

        // Set the view's delegate
        sceneView.delegate = self

        // Show statistics such as fps and timing information
        sceneView.showsStatistics = true

        // automatically add light to the scene
        sceneView.autoenablesDefaultLighting = true
    }
A quick explanation of the above: viewDidLoad() is a method of our ViewController class, which is called automatically as soon as your app is successfully loaded by iOS. It’s a good place to init some important properties. In our case, we enable displaying of the feature points and we also enable displaying of stats such as framerate or whatnot (we could remove this, but let’s keep it here). Another thing you usually do here is you set up various delegates. Let’s talk about delegates for a bit now!
Protocol and delegations
Delegation is a Swift design pattern that allows a type to hand over the control of some of its responsibilities (properties and methods) to another type without implementing those responsibilities itself i.e. your class implementation can call methods and access properties of the delegate instead of providing that functionality itself. This is similar to what you experience in Go when you pass in some interface type into your constructor functions.
iOS components seem to provide a lot of default methods that are triggered automatically without you even knowing about them, apparently. You can change their default behavior by providing their custom implementations. In our case, we basically “take control” of the ARSCNView delegate methods by assigning our self into the sceneView.delegate property. The nitty-gritty details of this are actually a bit more nuanced and the full explanation involves something called protocols.
Protocols are an incredibly powerful language construct akin to what you may have experienced in Go as interface types, alas protocols in Swift are a bit more powerful. That also means that you can shoot yourself in the foot very easily with them as well. But I do not want to bother you with them here. Feel free to check the official documentation
Notice how our ViewController class conforms to ARSCNViewDelegate protocol (classes are inherited, protocols are conformed to). This means what if we want to override the default behaviour of its methods we can do so. And indeed in our project, we totally will do that! If you open the documentation you’ll see the protocol requires the implementation of different variations of renderer method. In our simple app, we won’t provide any, but I read somewhere that some devs render a grid on the plane surface so they can better see when the surface has been detected!
Configure and start AR session
There are two important methods that XCode generated for us which are ideal to configure and start the AR session and which are called automatically when the view appears in camera. Their names are pretty self-explanatory:
viewWillAppearviewWillDisappear
Both methods have pretty self-explanatory names. viewWillAppear configures the AR World tracking and starts the AR scene session. viewWillDisappear pauses the session (such as when our app goes into the background – we don’t want the GPU expensive operations to keep running so it’s better to stop the AR session when that happens)
We will only slightly modify viewWillAppear method to enable vertical planeDetection. What we want is to achieve with this will be more obvious later on, but in essence, we want the ARKit` tracking to detect vertical surfaces in front of our phone when we hold it in a “gravity” orientation. This will help us place the sun on into the scene once we get its position.
Tap the sun
Now let’s get to the meat of the problem, now. We want to tap the screen and by doing that we want to place a sun (this is our AR Scene Node described earlier) into the image captured by the device camera. In order to do that we need to implement (actually override) the touchesBegan method which is called when a new touch is detected in a view or window. This is where we will place our sun into the scene.
The method itself is pretty simple. First, we pick the first touch result, find its 2D location in the coordinate system of our view (device screen), we then use this location to find the 3D position of the node in the real world as captured in the camera image. the hitTest method we use to find the location in the real world works in the way that it sort of “pierces" through the 3D space in front of us until it finds another object or surface and it then returns the detected objects/surface coordinates back to us:
        if let touch = touches.first {
            // NOTE: this is a 2D location on the screen -- we will need to convert it to 3D
            let touchLocation = touch.location(in: sceneView)
            // find 3D location int the the real world -- not the AR scene
            let results = sceneView.hitTest(touchLocation, types: .existingPlaneUsingExtent)
            ...
            ...
         }
We pick the first available result if we receive any result and then if the sun has already been created we stop its spin (we’ll talk about the spinning later on) if it is spinning or we spin it if it isn’t spinning yet. If the sun has not been placed into the scene yet, we first create it and then place it into the detected location in the sceneView.
            // we will pick the first results and unwrap it
            if let hitResult = results.first {
                if let node = sun {
                    // if the sun is spinning, stop it
                    // otherwise start spinning it
                    node.spinning ? node.stop() : node.spin()
                } else {
                    // create new sun
                    sun = Sun(radius: 0.1)
                    // ADD the sun to the scene
                    place(node: sun!, location: hitResult)
                }
            }
You may have noticed there is a lot of if let expressions in the code. This is what Swift calls Optional Binding. You can read more about the Optionals in Swift here. Optionals are similar to the Rust’s Option variant and its a feature I miss in Go a lot! Optional binding lets you prevent using an object which is nil before attempting to use it. But Optionals in swift are actually more powerful than that: they also allow for Optional Chaining which let you call a function or access a property only if the object itself is NOT nil.
The place method which does the placing of the sun onto the scene needs a bit of explanation as it might seem a bit tricky at first sight. First, we retrieve the z axis coordinate of the detected location and then we shift it by the size of the solar radius. Now, why are we doing that? Let’s have a look at the coordinate system in the gravity alignment:
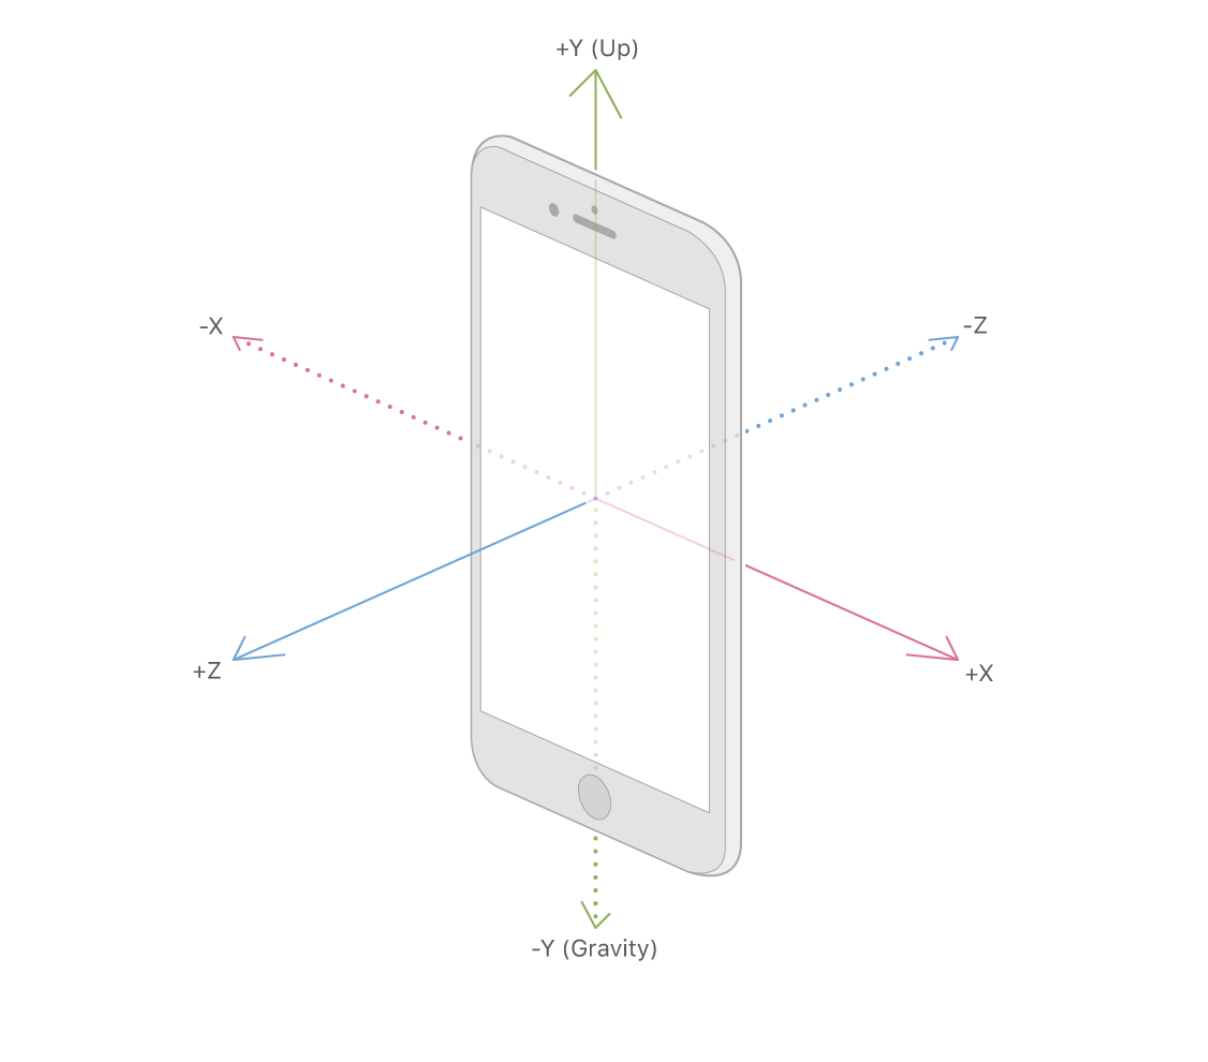
As you can see z axis are perpendicular to our device screen so if we place the sun on it half of the sphere will be hidden behind whatever surface we detect first in the sceneView.hitTest, so we shift the sun closer to us by increasing the z coordinate by the size of the sun radius.
Once we set the node position we place it into the scene
        node.position = SCNVector3(
            x: location.worldTransform.columns.3.x,
            y: location.worldTransform.columns.3.y,
            z: location.worldTransform.columns.3.z + node.boundingSphere.radius
        )

        // ad the node to the scene
        sceneView.scene.rootNode.addChildNode(node)
Let’s have a look at the Sun class which allows us to create the sun, spin it and stop it.
Sun
We have a designated Sun initializer which creates the 3D sun object which we then place onto the scene. We create a sphere with a given radius and wrap it in the texture read from an image of sun surface I downloaded here. The way we “wrap” the sun sphere is by setting its Material to the downloaded texture file. Notice that we reference the file via its relative path from the AR scene assets:
        let sphere = SCNSphere(radius: radius)
        let material = SCNMaterial()
        material.diffuse.contents = UIImage(named: "art.scnassets/sun.jpg")
        sphere.materials = [material]
NOTE: you must drag and drop the sun texture image into the AR assets – not the project assets!
Now, to the spinning. In order to get the sun spinning, we need to create an animation and we do it via SCNAction object. In our case, we want the rotation. I picked random rotation around x and z axis. Notice we set the duration timeout after which the rotation stops, but we actually we want the sun to keep spinning forever so we “wrap” the rotation action into repeatForever action. Once that’s done we’re set to go:
        // NOTE: this is how we create animation
        // NOTE: by multiplying the rotation we rotate 5 times more than just simple pi/2
        let spinAction = SCNAction.rotateBy(
            x: CGFloat(randomX * 5),
            y: 0,
            z: CGFloat(randomZ * 5),
            duration: 1.5
        )

        // repeate the action forever until stopped
        let repeatAction = SCNAction.repeatForever(spinAction)

        // start the action
        runAction(repeatAction)
When we want to stop the spin we simply remove all actions applied to the sun Scene Node.
And with this, we are done and ready to run the app!
NOTICE: You will need an iPhone which supports ARKit. You can check for that programmatically by checking the following boolean flag ARWorldTrackingConfiguration.isSupported
Conclusion
Implementing my first ARKit app was a lot of fun but also a fair amount of frustration (hello XCode and Swift). Most importantly it was a huge learning experience. Now, go ahead and enjoy the sunlight during the rainy days! You can find the full implementation of the app on GitHub.